
Ribs, Feet, & Pelvic Floor: How to Understand Running Mechanics & Boost Your Performance
Oct 19, 2023If I’ve said it once, I’ve said it a thousand times…. Running (Running Mechanics) requires rotation!
If we can dial in that rotation efficiently all the way up and down the chain, especially feet, hips, and ribs, that’s where things really start to come together. Today I want to talk about this in the context of the pelvic floor, illustrate how someone with pelvic floor symptoms while running could benefit from considering what’s going on at the ribs, and some exercises to try putting it all together.
The pelvic floor activity and how it affects running mechanics
The following image shows the pelvic floor activity through one full stride starting at the toe-off and ending at the next toe-off. Full disclosure, I used a bit of creative liberty looking at the original data in the article (1)

A few things to note:
1 - This graphic is showing the pelvic floor activity, as a percentage of the maximum voluntary contraction of the pelvic floor - the squeeze and lift of a kegel.
2 - The horizontal dashed line shows the standing baseline pelvic floor activity. Pelvic floor activity is elevated above the standing baseline level throughout the whole duration or running. The pelvic floor muscles can get tired just like any other muscles and progressive overload has value here too!
3 - The vertical dashed line denotes a foot strike in the stride. There is an anticipatory contraction of the pelvic floor before the foot even strikes the ground and then it peeks out at midstance. What causes that natural precontraction? In my professional opinion, it’s caused by, you guessed it, rotation!
By the way, a subsequent paper actually showed that women with stress urinary incontinence tended to show pelvic floor activity above maximum voluntary contraction in standing throughout the stride (2). This means that more tension/contraction, aka. doing more kegels likely isn’t the answer! Also, you can’t think that fast. So willing your pelvic floor to do this with each step isn’t going to work either.
So what is?... recapturing and practicing rotation up and down the chain while allowing the pelvic floor to do its thing moving through the full range of motion. Yes, in some cases pelvic floor isolation, practicing relaxing and contracting the pelvic floor through full range of motion, need to happen too but if we stop there and don’t put it together with the natural movement we aren’t going to get very far.
Pelvic Floor Activity and Rotation Running Mechanics

At the toe-off, your pelvis (darker orange oval in the image above) is rotated as far to that side as it’s going to go. Then in the float phase (both feet off the ground), the pelvis starts rotating back towards the other side. By the time the foot strikes the ground, you can ride that rotation, so to speak, which reduces the negative impact of the ground reaction forces* on the body and helps store the energy for an effective toe-off.
*read that last bit as ground reaction forces are good, we can use them to help move forward IF we rotate efficiently. If we don’t rotate efficiently that can sometimes lead to pelvic floor symptoms and other typical running pains.
The rotation happens at the pelvis and the torso (lighter and smaller colored oval) in opposite directions to balance the momentum and keep the head (white circle) facing forward. Using the left toe off to right mid-stance as our model, let's look at what’s happening at the pelvic floor.

At the toe-off, the pelvis is in more external rotation (ER). This correlates with more of a closed pelvic outlet and a descended (relaxed) anterior (front) pelvic floor. At mid-stance, the pelvis is in more internal rotation (IR). This correlates with more of an open pelvic outlet, an ascended (contracted) anterior pelvic floor, and as we know length in the back of the pelvic floor and glutes.
Because the pelvis is already rotating back right, from that more ERed position to a more IRed position, before the foot even reaches the ground we are seeing that bit of anticipatory contraction. That contraction maxes out at midstance when fully standing on that right leg.
We’ve looked at this rotation from a pelvis standpoint before but what’s going on up the chain at the ribs and down the chain at the feet matters too!
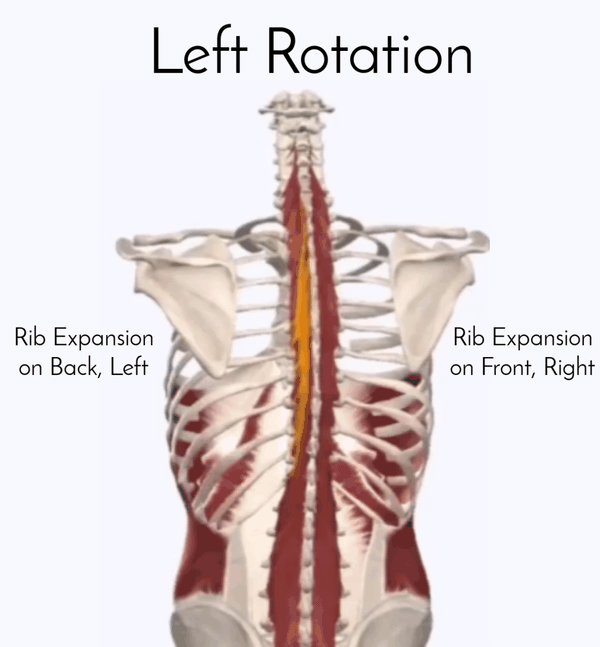
Rotation and the Ribs
Try this:
Step 1: Sit on a bench or kneel on the floor with your bottom on your heels. Rotate as far as you can from side to side. Take note of your range.
Step 2: Place your hands on your ribs. Take a long full exhale and feel your fibs draw in and create tension.
From there, try that rotation again. Can’t go quite as far, can you?
If your ribs can’t move well, you won’t rotate well. This is where I see lots of weird things happen with the arm swing in gait too.
So how do you train rib mobility?
1 - Let go of holding constant tension in your core!
2 - Breathe with your diaphragm and through your nose as much as possible.
Knowing where your ribs struggle to move most can be helpful. In the Women’s Running Academy Mentorship, we do a series of assessments to help you figure that out. Then we can use intentional positioning with the breathing to send air to specific parts of your ribcage and “stretch from the inside.” I would add something like this to your warm-ups.
For example, sake, breathing like this will help get more mobility in the front of the ribs.
Breathing like this will help get more mobility in the back of the ribs.
Keep in mind you might need both or something different on different sides of your body left to right (Learn more about your potential asymmetry here).
3 - Train rotation and rib mobility with upper body work.
Here are some examples of adapting your upper body exercises for your rib mobility needs.
- Pushup/Chest Press
- Inhale down to get more front rib mobility
- Inhale as you press to get more back rib mobility
- Rows
- Inhale as you pull to get more front rib mobility
- Inhale as you release back to get more back rib mobility
I was talking to one of my athletes recently and she said that she followed me talking about this “breathing stuff” for YEARS before working with me one-on-one where I forced her to actually try it……now she says “I won’t shut up telling people about the benefits of this breathing!”
So if you are also sitting here like yeah, whatever. I challenge you to commit to trying this “breathing stuff”, CONSISTENTLY for a little while and feel the difference!
4 - Build in some intentional rotation from there. Here are a few examples of some I’ve been loving lately:
Lay flat on your back with feet on the floor (knees bent up), holding a dumbbell with each hand's arms out at a 45-degree angle. Exhale to press your right arm up. Inhaling as you bring it back down and press the left at the same time. Continue alternating, inhaling as you press the left and exhaling as you press the right. This alternating with breathing gives you that reciprocal motion (aka. rotation) at the rib cage.
Set up in a half kneeling position with a band anchored overhead such that you are at a 45-degree angle from the anchor point with your knee down on the leg furthest from the wall. Half kneeling this way can be uncomfortable for some people (and an indication that you might need to look at the pelvis position and/or find some more length in those glutes) so you can place a block under that knee to help you sit back into the hip a little easier.
Hold the band in the same hand as the knee that is down. With your arm extended overhead let the resistance in the band turn you toward that front leg (you might feel yourself shift back into that hip a bit).
Feel all the nice movement in your ribs!
With a band anchored in front of you. Stand in a split stance, with the band in the opposite hand. Your torso will naturally turn toward that front leg with the resistance. Take a good inhale, exhale, keeping the ribs down pull the band back as you square up to the middle, and drive that knee up. Inhale to reset and repeat.
Feel how it all comes together.
Running Mechanic Rotation and the Feet
We call it pronation and supination, but really it’s reciprocal rotation at the foot.
We sometimes (mistakenly) think of pronation as the arch “falling” in. While the arch does lower and lengthen with true (good) pronation, it all begins with internal rotation. This is where we get true lengthening of the foot surface and can put the most effective force into the ground. Then with supination, we have external rotation. External rotation, coupled with big toe extension provides a nice rigid lever for an efficient toe-off.
True pronation (with rotation).
Arch falling in (obviously exaggerated)
I like to work on that true pronation with rotation using the following progression.
1 - Starting with the Half Kneeling Pronation Drill, to get a feel for that connection with rotation. Moving forward into pronation with internal rotation and moving back into supination with external rotation.
2 - Then build to the Heel Rocker Pronation Drill.
If you look at that true pronation from the side, you see that with that rotation the heel rocks forward. This is the part that many people struggle with in accessing true pronation. They skip past it and then usually just fall in as a result.
The Heel Rocker Pronation Drill slows down the motion and really focuses on nailing that part. Moving pressure from point 1 to point 2.
3 - Then we put it all together with the Rotating Pronation Drill.
Don't move here until you've got a good handle on the heel rocker piece.
Rotation, the Feet, and the Pelvic Floor
As illustrated above, the action of pronation happens from foot strike to midstance with that internal rotation at the pelvis and pelvic floor contraction. The action of supination happens from midstance to toe-off with external rotation and pelvic floor relaxation.
A very important foundational concept to understand is that max propulsion, meaning the maximum force you put into the ground happens at mid-stance with internal rotation and pronation. Efficient external rotation and supination, coupled with good hip extension, just finish it off strong.
It’s all connected!
Putting it All Together: Ribs, Feet, and Pelvic Floor
What can’t consciously happen altogether while we are running, so don’t even try!
What we can do is practice that connection with our strength training.
Here is just one way to do that:
With this hinge exercise, we combine the exhale (pelvic floor contraction), internal rotation, and pronation of mid-stance, followed by inhale (pelvic floor relaxation), external rotation, and supination of toe-off. It may look slow and easy, but this is a relatively advanced exercise that we build toward in the Women’s Running Academy as we put these pieces together over the full 12 weeks.
If you have been doing all the pelvic floor isolation work, but then still having symptoms with running. It’s probably time to put it together with your ribs, hips, and feet!
REFERENCES:
2- Leitner, Monika, et al. "Evaluation of pelvic floor muscle activity during running in continent and incontinent women: An exploratory study." Neurourology and urodynamics 36.6 (2017): 1570-1576.
Next on your reading list:
Rib Mobility Exercises! What if You Had Better Rotation and Rib Mobility?
Pelvic Floor Running Guide: Everything I Wish Runners Knew About the Pelvic Floor
Don't miss a thing!
Join my newsletter, be the first to know about what's coming up, and get even more great content!
