
Bladder Leaking While Running? It’s Not JUST Your Pelvic Floor
Mar 18, 2026Your bladder leaking while running is incredibly common—but that doesn’t mean it’s something you just have to live with. If you’ve been told to “just do more Kegels” and move on, you’re missing the bigger picture. The truth is, the bladder leaking while running is often a sign that your body isn’t managing pressure and force as well as it could, especially through your core, hips, and stride. In this article, we’ll break down what’s really going on and how to address it from a whole-body, performance-driven perspective so you can run stronger and with more confidence.
How I Can Help
Before we get into the details, I want to remind you that all of this and more will be part of my live virtual workshop, The Pelvic Floor Audit, which will take place on March 22nd.
During this workshop, we’ll walk through my four-point assessment designed to help you determine the primary contributing factors behind your pelvic floor symptoms; all so that you can run freely and confidently without worrying about your pelvic floor symptoms.
In this post I begin by defining what normal pelvic floor function looks like in everyday life. Then we’ll discuss common red flags that may indicate dysfunction, look at some surprising statistics about how often these issues occur, and explore how pelvic floor function connects directly to your running stride. Then I’m going to walk you through the framework of that four-point assessment. However, if I’m honest, this material is even better when you can see it and experience it in real time. The visuals, interaction, and live feedback during the workshop make the process much clearer.
Click here to learn more and register now….. Did I mention it's FREE?
Still, this post will give you a solid overview of how the pelvic floor integrates with the rest of your body and how pelvic floor health connects with your movement, strength training, and running mechanics. This is not about lying on the floor doing isolated breathing exercises. It’s about understanding how the pelvic floor works as part of a whole-body movement system.
Understanding Pelvic Floor Function
What Normal Pelvic Floor Function Looks Like
Let’s start with the basics. In daily life, normal pelvic floor function generally includes the following:
- You urinate every two to four hours, not more frequently.
- You wake to urinate zero to one time per night.
- Sexual activity is comfortable and pleasurable.
- There is no leaking of urine or stool.
- Bowel movements occur without straining or forcing.
This may sound straightforward, but it’s common for these norms to get disrupted.
As a middle school teacher, I actually end up discussing this topic with my students during units on human body systems, specifically when we talk about the urinary system. Some of my middle school girls ask to use the bathroom every single class period. That means they’re trying to go about once every hour.
Realistically, they’re probably not actually peeing every time. Sometimes they just want a break from class or a few minutes on their phone (I’ve gotten really good at recognizing the quick slip of the phone from the backpack to a pocket or tucked under a sweatshirt!). But going to the bathroom more often than needed can train the bladder to empty more frequently than necessary, which can create problems later on.
While that’s a bit of a funny classroom anecdote, it highlights something important: our habits can train our pelvic floor system, for better or worse.
But pelvic floor health isn’t only about bladder and bowel function. Your bladder leaking while running is about how you move.
Runners with well-functioning pelvic floors tend to have a stride that looks smooth, elastic, and almost effortless. Their movement flows.
This is something people rarely consider. Pelvic floor symptoms are more than just annoying and embarrassing, they are a clue that you’re also probably losing energy somewhere in your stride.
Red Flags of Pelvic Floor Dysfunction
Pelvic floor dysfunction can show up in a variety of ways. Some of the most common red flags include:
- Needing to urinate more often than every two hours
- Pain in the pelvic floor or surrounding joints (Low back pain is extremely common with pelvic floor dysfunction)
- Urinary or fecal leakage
- Hemorrhoids
- Painful intercourse
- Constipation or straining during bowel movements
- A stride that feels clunky or inefficient
Many people only think of pelvic floor issues in terms of leaking, but the pelvic floor is deeply integrated with the rest of your movement system. When something is off, the effects often show up elsewhere in the body.
The Statistics Behind Pelvic Floor Dysfunction
The numbers surrounding pelvic floor dysfunction are eye-opening. Take these statistics from a 2008 study (1).
Among nulliparous women, women who have never had children, about 12.8% experience pelvic floor dysfunction.
That percentage increases with childbirth:
- 18.4% of women who have had one child
- 24.6% of women who have had two children
- 32.4% of women who have had three or more children
But here’s the statistic that tends to be more surprising…
Among elite collegiate athletes, about 33% experience pelvic floor dysfunction, and the average age in this group is under 24 years old.
This means one out of three high-level athletes—many of whom have never had children—are experiencing symptoms like leaking when they jump, sneeze, or run.
Heck, I’ve been told on more than one occasion that some of you used to think “wearing pee at the finish line in a crosscountry meet was a badge of honor. It meant you left everything out there on the course.”
Leaking Isn’t Just Embarrassing—It’s a Power Problem
This is the important piece you need to understand!
Your bladder leaking while running isn’t just embarrassing.
It’s a power problem.
Symptoms like leaking are clues that something in your system isn’t working efficiently. Peeing during a run may be a sign that your body isn’t managing forces well as you move.
That has both enjoyment and performance implications. If your body can’t manage those forces well, you’re probably not producing as much power in your stride as you could be.
Many runners cope with symptoms by:
- Always wearing black running shorts
- Using pads during runs
- Planning routes around bathrooms
- Holding back during hard efforts or race finishes
Those workarounds might feel easier than trying to solve the problem. After all, putting time and effort into something uncertain can feel frustrating.
But the key insight here is that leaking is a symptom, not the root problem.
And often that symptom is telling you that your movement system isn’t capturing and using energy as effectively as it could.
Reducing pelvic floor symptoms often goes hand-in-hand with improving how efficiently you load into mid-stance and propel forward during running.
The pelvic floor is intimately connected to how your body absorbs and produces power with each stride.
The Pelvic Floor Fundamentals Framework
Inside my full Pelvic Floor Fundamentals course, I teach seven core principles that explain how the pelvic floor functions within the body:
- The pelvic floor is part of the whole system.
- The pelvic floor works through length, not just squeezing.
- The pelvic floor has four quadrants.
- The adductors and glutes are windows into pelvic floor function.
- The foot is also a window into the pelvic floor.
- The pelvic floor is dynamic, not static.
- Overall strength supports pelvic floor health.
These ideas help us understand that building pelvic floor function isn’t about isolating a single muscle. It’s about creating a dynamic, coordinated system.
The Pelvic Floor Audit is designed to help you identify which pieces of that system might need the most attention.
The Four Points of the Pelvic Floor Audit
In my email from Tuesday, March 17th we related these 7 fundamentals to the following four-point assessment that forms the backbone of the Pelvic Floor Audit.
- Stack and pressure management
- Length in the posterior chain
- Hip rotational capacity
- Foot rotational capacity
Go beyond breathing, squeezing and isolated pelvic floor strengthening and identify the root cause so that you can run freely, without worry!
My four-point assessment goes beyond isolating the pelvic floor action to how it integrates with movement (strength training, running and jumping) and the rest of the body.
Register for the FREE Pelvic Floor Audit here.
Each of these areas plays a role in how your body absorbs and produces force during running.
1. Stack and Pressure Management
We begin with your core canister.
Instead of thinking about the core as just your abdominal muscles, imagine a cylindrical system made up of:
- The abdominal muscles in the front
- The back muscles behind you
- The thoracic diaphragm (your main breathing muscle) on top
- The pelvic floor at the bottom
These structures work together to create intra-abdominal pressure, which helps protect your spine, stabilize your body, and transfer force as you move.
When this system works well, pressure is distributed evenly. But if the system isn’t coordinated, excessive pressure can get pushed downward into the pelvic floor, contributing to symptoms.
A key piece of this system is finding your stack. This is where the thoracic diaphragm sits neatly above the pelvic diaphragm so they can work together efficiently.
To achieve this alignment, several things need to happen:
- You need access to pelvic neutral, rather than constantly tucking your pelvis under.
- You need the ability to move through anterior and posterior pelvic tilt.
- Your rib cage must stack over your pelvis.
- You must be able to perform long, full exhales without collapsing your posture.
- Your ribs must expand 360 degrees during breathing.
Rib movement is especially important. If your ribs don’t move well, the pressure generated during breathing and movement often gets pushed downward into the pelvic floor.
Assessing Rib Movement Through Shoulder Range of Motion
To evaluate rib cage mobility, we can use shoulder range-of-motion tests as indirect indicators.
Two assessments are particularly useful:
- Overhead Reach
- Apley’s Test
The overhead reach gives insight into how well the back of the rib cage moves, while Apley’s test provides information about the front of the rib cage.
The Overhead Reach Assessment: Assessing the Back of the Rib Cage
For this test, sit with your back against a wall. The wall helps prevent you from cheating the movement.
- Extend your arms straight in front of you.
- Turn your thumbs upward so your palms face each other.
- Keep your arms parallel, like they’re running along railroad tracks.
- Slowly raise your arms overhead as far as you can.
As you perform the movement, maintain these rules:
- Don’t allow your arms to drift wider apart.
- Don’t let your back leave the wall.
- Don’t let your lower ribs flare upward to compensate.
Ideally, your arms should reach all the way overhead beside your ears without “cheating.”
If your arms stop short of that position or you have to cheat by arching your back, flaring your ribs or widening your arms, it likely means the back of your rib cage is compressed and not moving as well as it should.
Think of your core canister like a balloon. If pressure is applied to the top/back of that balloon—specifically the back ribs—where does the pressure go?
It travels down and forward, often pushing outward into the lower abdomen and downward into the front portion of the pelvic floor. This pressure shift can contribute to symptoms such as pelvic floor heaviness, leakage, or that familiar lower belly “pooch.” I hate the word, but I know you know what I mean when I use it.

The Apley’s Test: Assessing the Front of the Rib Cage
To evaluate how well the front of the rib cage moves, we use a test called Apley’s.
For this assessment:
- Reach one arm down and behind your back.
- Try to touch your opposite shoulder blade with that hand.
If you cannot touch the opposite shoulder blade, or if your shoulders roll forward to create the movement, that indicates the front of your rib cage is compressed and not moving well.
Now connect that back to the pelvic floor.
If you exaggerate that forward shoulder position—rolling the shoulders forward and collapsing the chest—you’ll feel how the pressure in your core canister shifts downward. If pressure cannot move upward through the rib cage, it has nowhere else to go except down into the pelvic floor.
A rib cage that doesn’t move well essentially sets the pelvic floor up for failure. Limited rib cage movement also affects something else that runners rely on: rotation. A rib cage that doesn’t move well doesn’t rotate well, and rotation is essential for running. The pelvic floor is intimately connected with the deep hip rotator muscles, which means rib mobility influences the entire rotational chain.
Running, after all, is fundamentally a rotational movement. So, rib cage mobility matters not only for pressure management but also for the rotational mechanics that power your stride.
If these assessments reveal that your rib cage movement is limited, improving rib mobility becomes an important step. We also go deeper into practical strategies during the Pelvic Floor Audit workshop.
Pelvic Position and Finding Neutral
While rib movement matters, the pelvis also needs to be able to position itself well underneath the rib cage.
The goal is to find pelvic neutral so that the pelvic bowl can sit comfortably beneath the rib cage, allowing the core canister to function as a coordinated system.
To understand this, it helps to look at the extremes of pelvic positioning.
An anterior pelvic tilt occurs when the hip bones tip forward. This increases the inward curve of the lower back.
A posterior pelvic tilt happens when you tuck your pelvis under.
But here’s the key point: when most people try to tuck their pelvis under, they simply squeeze their glutes and shove their hips forward. That’s not true pelvic control.
Instead, we want the ability to:
- Access pelvic neutral
- Move smoothly between anterior and posterior pelvic tilt
The primary muscles responsible for helping you control this movement are the hamstrings—especially the proximal hamstrings, which attach high up near the pelvis.
The Toe Touch Assessment
One simple way to evaluate this system is through a toe touch test.
Stand upright with your feet together and legs straight, then bend forward and attempt to touch your toes.
This assessment tells us several different things, but in this context we’re focusing on what it reveals about backside expansion and pelvic positioning.
If you cannot reach your toes, it likely means you struggle to create expansion in the back of your body. This often corresponds with limited rib movement on the back side as well. In this way the overhead reach test and the toe touch test frequently go hand in hand. It also could mean you struggle to find length in the back of the pelvis/pelvic floor. You’ll see why this is important in the second point of the assessment.
On the other hand, if you can bend over and place your palms flat on the floor, it likely means you have a lot of mobility but potentially not enough stability in the pelvis. One issue within this case is the body may compensate by squeezing the glutes and pushing the hips forward to create stability.
That strategy isn’t ideal when we’re trying to find proper length and function in the posterior chain. Again, this will all make more sense in point 2 of the assessment.
Moreover, if you fall into the “super bendy” category—easily placing your palms on the floor—the concept of stacking the rib cage over the pelvis becomes even more important.
Stacking helps create a sense of safety and stability for the body.
When the body doesn’t feel stable, which can often be the case for a body with excess mobility in the connective tissue, it tends to create tension somewhere to compensate. That tension might show up as:
- Clenched glutes (and pelvic floor, the don’t operate separately)
- Tight neck or shoulders
- Tension in the calves
- Over-bracing through the core
And here’s the problem: constant tension is the opposite of a responsive pelvic floor.
A healthy pelvic floor needs the ability to lengthen and relax before it contracts. If everything is constantly clenched, that responsiveness disappears.
For runners who are naturally flexible, developing strength and control through the proximal hamstrings, establishing a good stack, and building functional stability can make a huge difference.
2. Finding Length in the Back
The second point in the Pelvic Floor Audit looks at your ability to find length in the backside of the pelvis.
Before diving into the assessment itself, it helps to understand why this matters for running.
Absorbing and Rebounding in the Running Stride
During the stance phase of running, we can think of the movement in two phases:
- Absorbing (loading)
- Rebounding (propelling)
From the moment your foot lands until you reach mid-stance, your body is absorbing force. This loading phase occurs through internal rotation of the pelvis and hip.
Once you move past mid-stance, the body transitions into external rotation, which helps propel you forward.
This internal-to-external rotation sequence is essential for efficient running mechanics.
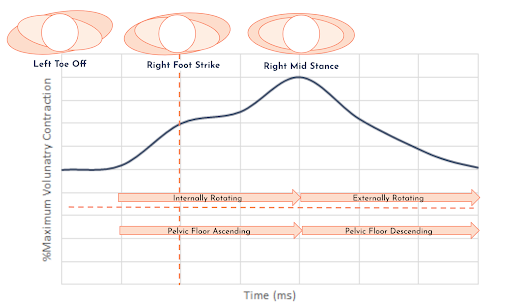
If you look at studies measuring pelvic floor muscle activity during running (2), you can clearly see two important patterns.
First, pelvic floor activity stays elevated above baseline throughout the entire run. Like any other muscle group, the pelvic floor experiences progressive load and can fatigue.
This means that if you notice pelvic floor symptoms toward the end of your run, it may simply reflect a need to build more strength, endurance, and capacity in that system.
The second pattern is even more interesting (to me at least).
Pelvic floor muscles actually show pre-activation before the foot even hits the ground.
If you look at the graph of muscle activity, the pelvic floor would remain above baseline (the horizontal orange line) the entire time. Activity is lowest at toe-off, but immediately after toe-off—before the opposite foot even strikes the ground—the activity begins increasing again.
It then reaches its maximum activity at mid-stance, when the body is in its deepest internal rotation and producing the greatest ground force.
Why Does This Pre-Activation Happen?
My hypothesis and professional opinion is that rotation plays a major role.
As you move from toe-off into the next step, your body begins transitioning from maximum external rotation toward internal rotation on the stance leg. That rotational movement starts before the foot ever contacts the ground.
The pelvic floor naturally lifts during internal rotation! This lift doesn’t come from consciously squeezing the muscles. It’s not a Kegel. Instead, it occurs because internal rotation creates length in the back portion of the pelvic floor, and that length produces a natural lift.
This is why the ability to find length in the backside is so important. When the pelvic floor can’t lengthen especially in the back, it can’t respond properly to the demands of running.
Using the Toe Touch and Toe Touch to Squat to Assess Posterior Length
We can return to the toe touch test above to evaluate backside length as well.
If you cannot touch your toes at all, that’s often a sign that you struggle to shift your center of mass backward and access length through the back of the ribcage and pelvis.,
And we can take it a step further.
The Toe Touch to Squat Test
From the toe touch position:
- Bend your knees while holding onto your toes.
- Squat down as far as you can without falling over.
- Keep your heels on the ground.
If you cannot squat down fully in this position, it’s another indication that you may struggle to find length in the back side of your body.
There’s another practical clue many runners notice in the gym.
If you perform squats and only ever feel your quadriceps working, but never feel your glutes, that’s often a clue that you’re not accessing proper length in the back side.
When the system is working well, squats involve the glutes, hamstrings, and posterior chain, not just the quads.
Sore glutes after a heavy squat session is a signal that the pieces are connecting well. And this isn’t just about pelvic floor symptoms. It’s about moving efficiently everywhere—in running, in squats, and in strength training.
3. Hip Rotation: The Pelvic Floor Has Four Quadrants
Another key concept in the Pelvic Floor Audit is that the pelvic floor isn’t just one uniform structure. It functions more like four quadrants:
- Front
- Back
- Left
- Right
Imagine drawing a circle and placing a cross inside it. Each section represents a quadrant.
Because running involves reciprocal rotation through the pelvis, these quadrants must coordinate with each other dynamically. Internal and external rotation of the hips requires different areas of the pelvic floor to respond at different times.
When the front of the pelvic floor shortens and the back lengthens, that corresponds with external rotation. This is the phase of the stride where you’re propelling forward, moving toward toe-off.
When the front of the pelvic floor narrows and the back opens, like what you might feel during a hinge movement or when you create length in your back pocket, that corresponds with internal rotation. This is the phase where you’re absorbing force and putting energy into the ground.
These patterns happen reciprocally from side to side while running. As you load one leg, the pelvis rotates and the pelvic floor responds dynamically in each quadrant.
We already saw that, if you can’t lengthen the back of the pelvic floor effectively, the system struggles to move into internal rotation. That makes it harder to absorb force properly and prevents that natural lift through length from occurring.
This is why you can do all the breathing exercises and Kegels in the world, but if those exercises aren’t coordinated with your stride mechanics and rotational patterns, the improvements often don’t transfer into running.
When we translate this to our running stride it requires the body to shift weight side to side, loading the right leg, then the left, then back again. The pelvic floor must be able to reciprocally find length in one back pocket and then the other.
Hip Rotation Assessment:
The third point of the Pelvic Floor Audit evaluates hip rotation.
This assessment gives insight into how well your hips move through internal and external rotation, which directly relates to how the pelvic floor quadrants coordinate during running.
This test is easiest to perform lying on your back.
- Lie on the floor with your feet on the wall, as if you were standing on the wall while lying down.
- Bend one leg so the hip and knee are at about 90 degrees.
- Your thigh should remain vertical, while your lower leg stays parallel to the floor.
- Without moving the thigh, rotate the hip so that your foot swings inward, and then rotate so your foot swings outward.
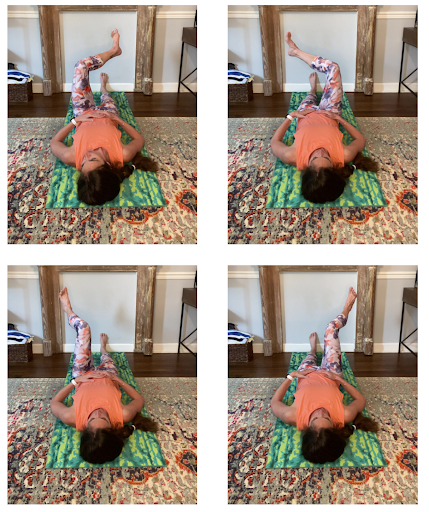
These two movements represent the two rotational directions:
- Foot swings inward → External rotation
- More length in the front of the pelvic floor
- Shortening in the back of the pelvic floor
- Foot swings outward → Internal rotation
- More length in the back of the pelvic floor
- Shortening/lifting in the front of the pelvic floor
During this assessment, many people notice that one side rotates differently than the other. One hip may struggle more with internal rotation, while the other struggles with external rotation.
This asymmetry can help us understand how the four quadrants of the pelvic floor are functioning. In some cases, the entire system may struggle to find length. In other cases, the issue may be more side-specific, which can guide how you approach training or treatment.
4. The Feet
The final point in the Pelvic Floor Audit looks at something many runners don’t immediately associate with the pelvic floor: the feet. But the connection is incredibly important.
During the running stride, the body moves through a coordinated chain of rotational movements. As you land and move toward mid-stance, the body moves into internal rotation and the foot moves into pronation.
Pronation is essentially internal rotation at the foot and lower leg, allowing the body to absorb force and load the system.
At midstance in the stride:
- The foot reaches maximum pronation
- The hip and pelvis reach maximum internal rotation
- Pelvic floor activity reaches its highest level
From there, the system transitions into external rotation as the foot moves into supination.
At toe-off, the foot becomes a more rigid lever:
- The foot is supinated
- The big toe moves into dorsiflexion
- The body uses that rigid lever to push off from and propel forward
This cycle—pronation to supination—mirrors the absorption and propulsion phases of running.
Assessing Static Foot Pressure
The first step in evaluating the feet is simply observing how you stand.
Stand naturally and pay attention to where you feel pressure in your feet. It can help to close your eyes while doing this.
Ask yourself:
- Do you feel more pressure on one foot than the other?
- Do you feel more pressure toward the front or back of your feet?
- Do you feel more grounded on the inside edges or the outside edges of your feet?
These sensations can reveal important clues about how your body moves.
For example:
- If you feel more pressure on the balls of your feet, it often means you struggle to shift your center of mass backward and find length in the posterior chain.
- If you feel more pressure along the outside edges of your feet, you may have a more supinated, rigid foot, which can make it harder to move into pronation and absorb force.
Remember that pronation is linked with internal rotation up the chain, which in turn supports the natural lifting and loading pattern of the pelvic floor.
Assessing Dynamic Foot Movement
After evaluating static pressure, the next step is to look at how the feet respond during rotation.
- Stand with your feet about hip width apart.
- Cross your arms across your chest.
- Rotate your torso to one side, then the other, as far as comfortable.
As you rotate, pay attention to how the pressure shifts across your feet and notice whether your feet maintain a tripod connection with the ground.
The tripod consists of three points:
- The heel
- The ball of the foot under the big toe
- The ball of the foot under the pinky toe

Ideally, these three points stay connected as you rotate.
If you notice that rotating to one side causes the big toe side of the foot to lift, or the opposite side of the foot to lose contact, it suggests that the feet are not rotating properly.
Instead of moving through pronation and supination, the foot may simply be tipping side to side in inversion and eversion.
That might sound like a small distinction, but it’s a big deal. When the foot tips rather than rotates, it can change the way force is distributed along the entire chain.
It might seem surprising, but the feet can often be the missing puzzle piece for runners who have tried everything else to improve pelvic floor symptoms.
If you’ve already worked on finding length in the posterior chain and improving hip movement but still struggle, the feet may be the last piece of the system that needs attention.
Bringing the Four-Point Assessment Together
The Pelvic Floor Audit looks at four key components of the movement system:
- Stack and pressure management
- Rib cage mobility and pelvic positioning
- Length in the back side
- Ability to create length in the back of the pelvis and glutes creates a natural lift of the pelvic floor
- Hip rotational capacity
- Internal and external rotation that coordinates the pelvic floor quadrants
- Foot rotation
- The ability to move through pronation and supination while maintaining a stable tripod
You may notice something important about this process.
None of these assessments directly test the pelvic floor itself.
You can absolutely work with a pelvic floor physical therapist for an internal assessment, and that can be incredibly valuable. Those evaluations often reveal tightness or restrictions that correlate with the movement patterns we’ve discussed here.
For example, if you struggle to find length in the back of the pelvis, it’s common to also have tightness in the back portion of the pelvic floor.
Pelvic floor physical therapists can help address those issues with manual therapy and targeted treatment. But ultimately, the improvements still need to be integrated with movement.
That’s where this audit becomes powerful. It helps bridge the gap between isolated pelvic floor therapy and the dynamic demands of running.
An Invitation to the Pelvic Floor Audit Workshop
Again if you’d like to work through this process in real time, I’m hosting the Pelvic Floor Audit Workshop on March 22 at 12 p.m. Eastern.
This is a free virtual workshop designed specifically for female runners who want to enjoy running without constantly worrying about their pelvic floor.
During the 90-minute session, we’ll walk through the entire four-point assessment together. You’ll see the movements visually, feel them in your own body, and receive guidance on how to interpret your results.
By the end of the workshop, you’ll have identified the main contributing factors behind your pelvic floor symptoms and will leave with a clear action plan for addressing them.
Remember, your bladder leaking while running means you’re likely losing power in your stride as well.
Improving pelvic floor function isn’t just about symptom management. It’s also about running more efficiently. It’s about a stride that feels more fluid and free.
Imagine finishing a race without worrying about leaking during your final kick. Imagine pushing hard on a downhill without fear of losing control. Imagine running routes based on what you enjoy—not where the bathrooms are.
Instead of relying solely on breathing drills, squeezing exercises, or isolated pelvic floor strengthening, the goal is to identify the root cause and address it as part of a system.
When you register here you’ll receive:
- Supporting resources sent via email
- A one-page assessment tracker so you can record your results and observations
- And the link to join the live workshop when it’s time
On March 22, you’ll join live, work through the assessments together, and connect the dots so you can move forward with a clear plan instead of simply managing symptoms on the surface.
If this information resonated with you, or if you know another runner who might benefit from it, sharing this post could help someone else finally connect the dots between their pelvic floor symptoms and their running mechanics.
References:
1) Nygaard I, Barber MD, Burgio KL, Kenton K, Meikle S, Schaffer J, Spino C, Whitehead WE, Wu J, Brody DJ; Pelvic Floor Disorders Network. Prevalence of symptomatic pelvic floor disorders in US women. JAMA. 2008 Sep 17;300(11):1311-6. doi: 10.1001/jama.300.11.1311. PMID: 18799443; PMCID: PMC2918416.
2) Williams AMM, Sato-Klemm M, Deegan EG, Eginyan G, Lam T. Characterizing Pelvic Floor Muscle Activity During Walking and Jogging in Continent Adults: A Cross-Sectional Study. Front Hum Neurosci. 2022 Jun 30;16:912839. doi: 10.3389/fnhum.2022.912839. PMID: 35845247; PMCID: PMC9279930.*
* I created my own smooth curve from the data in this paper as the visual shown above.
Next on Your Reading List
The Big Picture on the Pelvic Floor and Running—Fewer Leaks, More Power
Glutes And Pelvic Floor, How to Load Better, Improve Rotation, Run with Less Pain
Why “Lift Heavy” Isn’t Just a Trend—And How to Make It Work for You as a Midlife Runner
Don't miss a thing!
Join my newsletter, be the first to know about what's coming up, and get even more great content!
